 Loading... Please wait...
Knowledge
Newsletter
Methods
Mosaic Methods
When you are first introduced to mosaics, one of the most confusing aspects can be the different methods. Part of this confusion comes from the names - indirect, direct, double reverse. Below we have done our best to simplify and clarify these methods. They are actually quite straightforward and the names make perfect sense when you understand the method. We have included links to websites and videos to help with the explanations. There are many other resources and YouTube videos available and if you know of one that you think would be helpful to our explanations, please drop us a line through our Contact page.
THE DOUBLE REVERSE OR RAVENNA METHOD
The Ravenna method is considered by many to be the pinnacle of mosaic technique. A key advantage of this method is that you can carefully create a more exact mosaic and make changes to it before placing it into its permanent base. We provided a brief overview of this technique but for a better understanding, we highly recommend viewing the video below from the Mosaic School in Ravenna and reading Michael Kruzich's excellent article describing the Ravenna method in detail. You can also visit the websites of these resources directly at Mosaic Art School and MKMosaics.
|
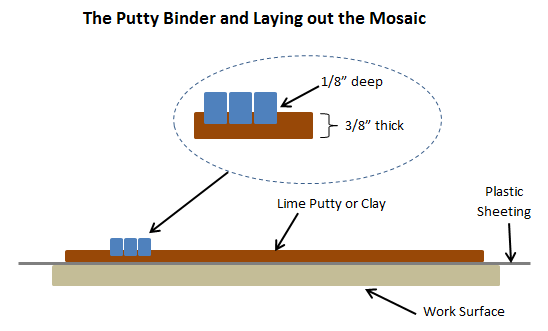
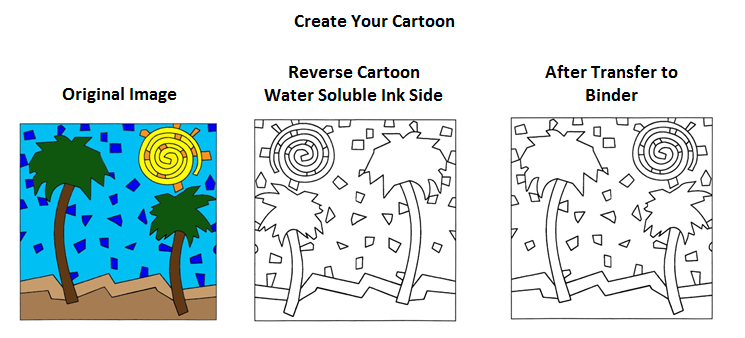
With the Ravenna method, the mosaic is made on a temporary bed of lime putty or clay. For lime putty, use hydrated lime that sets in air. Do not use hydraulic lime because it sets in water. For small mosaics, you can use water based clays such as that used to make ceramic tiles. Do not use polymer based modeling clays as these clays are made with oils which leave behind an oily residue that must be cleaned. There are several consideration when choosing between lime putty and clay. Lime putty is softer than clay and easier to press in and move around the tesserae. Lime putty also stays softer much longer than clay and is easier to remove once dry. However, lime putty is more expensive than clay. If you want to learn more about lime putty and its special characteristics, visit fresco-techniques. Using a rolling pin or other cylindrical object, roll out the putty or clay into a uniform bed on a flat work surface. The bed should be about 3/8" thick. You can place a plastic sheet between the bed and the work surface. With clay this is recommended because the plastic will also slow down the drying process by preventing the wood from soaking up the water from the clay. When using lime putty, this isn't as big of a problem because the putty remains pliable much longer. In fact, using a bare board, either OSSB (Oriented Structural Straw Board) or MDF (medium density fiberboard), can be preferable as it will help the putty dry, which is necessary at the end of the double reverse process. To help guide laying out the tesserae for your mosaic, you should create a cartoon, which is a full-size line drawing of your image on paper. Because you will be transferring the cartoon to the binder, if your image has a "left" and "right" orientation, you must create a reverse image of the cartoon. If your image is in the computer, this is easy - just do a horizontal rotation of the image. If your image is on paper, use a lightbox to retrace the upside down image. Paper, taped to a window, can also substitute for a lightbox. When tracing, it is important to use a water soluble ink marker. When the tracing is complete, place it on the binder, water soluble ink side down and let it set for a few minutes. When the tracing is lifted (lift straight up, don't allow any dragging) from the moist lime, the cartoon outline, reversed again, will remain on the lime or clay. Thus the name, "double reverse". To keep the binder soft, periodically sprinkle/spray the surface with water and cover it with a plastic sheet each day or more frequently depending on ambient humidity. You are ready to begin placing the tesserae in your design and creating your mosaic. As pieces are placed, one of the benefits of the double reverse method is that you are able to easily move and replace pieces. As you do so, you may need to use a small trowel to rework and flatten the binder bed. |
|
|
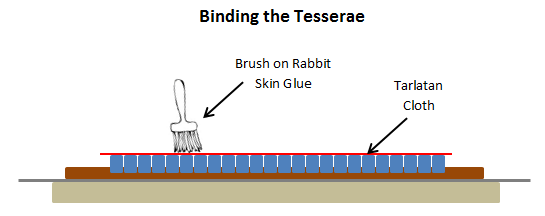
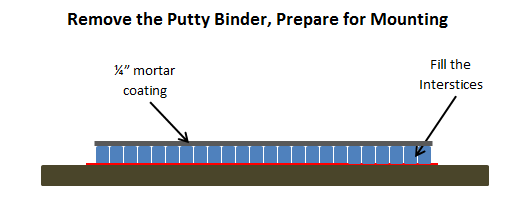
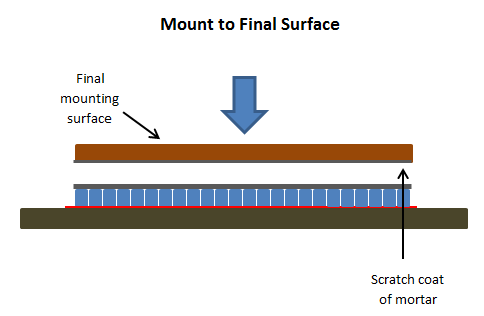
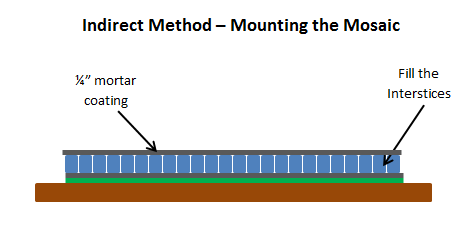
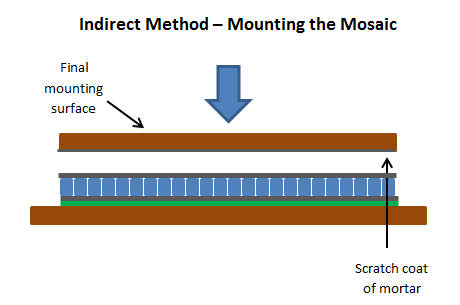
When you are done placing the tesserae for your mosaic, you will need to remove the mosaic from the lime putty base. Begin by binding the tesserae to a heavy duty, open-weave fabric, such as tartalan or several layers of cheese cloth. The glue must be water-soluble. Mosaicists in Ravenna use rabbit skin glue because it is very strong, bonds quickly, and dissolves easily in hot water. It comes in pellets which must be prepared with the correct proportion of water to reach the correct consistency and strength. Unused glue can be melted and used again. One the glue has completely dried, place another board on top of the mosaic and then squeezing everything together, flip the mosaic over. Remove the binder, being sure to remove all putty or clay. Next, sprinkle marble dust onto the surface of the mosaic to fill the interstices (the gaps between the tesserae). This will prevent any mortar from oozing into the gaps and then showing up on the finished surface. Once the interstices are filled, apply an even coating (about 1/4") of mortar across the mosaic.You can purchase an inexpensive scratch trowel at any hardware store. Prepare the final mounting surface by applying a scratch coat of mortar to the mounting surface. A scratch coat creates a mortar base with peaks and valleys. This surface allows the mortar to spread evenly when pressing the mosaic to the mounting surface. You can purchase an inexpensive scratch trowel at any hardware store. Place the final surface upside down onto the mosaic. Press down gently to begin the bonding process. Flip the mosaic one final time and remove the bottom board. Gently press down across the face of the mosaic to ensure a good adhesion and to remove any air bubbles and gaps. Finally, using hot water, soak the glue holding the top binder. As the glue soften, remove the cloth. Use brushes to clean any excess glue from the face of the mosaic. |
|
DIRECT METHOD
|
With the direct method, you place tesserae, piece by piece, directly onto the foundation using an adhesive. This is one of the most common mosaic methods. A basic introduction can be found on the Joy of Shards website. |
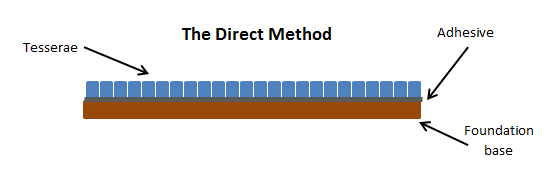 |
For adhesives, it depends - indoor or outdoor.
For more information on adhesives and mounting, see our Installation page. |
|
DIRECT METHOD WITH MESH
|
This method is used to make mosaics by first fastening the tesserae to a fiberglass mesh. This method works well for making a mosaic that can then be installed elsewhere. |
 |
|
You glue your tesserae onto the mesh using a thin layer of adhesive (Weldond works well, we also recommend Titebond floor glue). Be sure to put a piece of clear plastic wrap, such as Saran wrap, or wax paper between the mesh and your work surface so you do not end up gluing your mosaic to the surface. For the mesh, you want to use an alkaline resistant mesh, typically made of fiberglass. Be careful not to use too much glue when attaching the tesserae to the mesh. When you to install, you want the final adhesive, for example thinset, to be able to bond directly to the tesserae. This is particularly important for outdoor installations. To install the mosaic, a thin layer of adhesive (Weldbond, thinset, etc.) is spread directly onto the final surface and then the mosaic is simply pressed to this adhesive layer. |
|
REVERSE METHOD
|
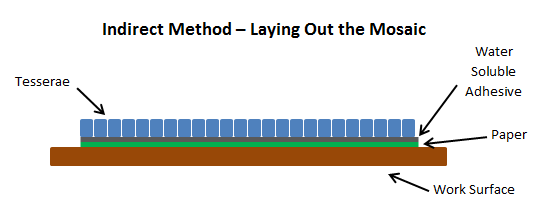
In the reverse method, tesserae are fastened face down using water-soluble glue onto a strong paper sheet, which has on its face the inverted design. For this method, flour glue or starch paste is the preferred adhesive. In addition, the paper used should be tear and wrinkle resistant. The following two videos are also excellent guides to the indirect method: |
|
|
|
|

